TYPES OF LIGHTNING IN PRODUCT PHOTOGRAPHY

Regardless you are a hobbyist or a professional, understanding that light is very important factor of the images you shoot is crucial. You can get it from a window, a lamp or a professional lighting set.

1. Continuous Lighting Kits

Continuous lighting kits are useful in product photography or video. A big advantage is that you are able visualize how your light will appear in an image before you shoot. So it will be easier to change and manipulate the lights. This type of lighting will be great for beginners because it will let them manipulate the light manually and will be very cost efficient compared to other types of lighting kits.

There are three major types of continuous lighting bulbs: fluorescent, tungsten & LED. All types are great, so choosing which to use is mainly a matter of personal preference.

Fluorescent does not overheat, so that is what most studio photographers use. LED is a safer option to tungsten because they tend to not overheat as much. It doesn’t matter which color tone bulbs you’ll use, remember to set white balance on a camera to Auto or manually according to the type of bulb you’ll be using to get accurate colors.

With an adjustable power kit you’ll have even more control over how much the light in the environment. This will allow you to manually manipulate your light even more than just a one bulb continuous lighting kit.

2. Speedlight Lighting Kits

Speedlights are external units that can be used with umbrellas and softboxes dispersing the light. They are faster than standard flashes and can be very versatile. It is best to use speedlights for stills, product shots, or action shots at weddings and sporting events.

Speedlights are extremely lightweight and portable, they are great alternatives for setting up quick but effective on-the-go studios.

3. Monolight Strobe Lighting Kits

Monolights are self-contained strobe units that include power sources, reflectors and stands.

The main advantage to monolights is that there is no need for an additional power generator because all of that is contained in the head of the lamp. Monolight should be 150+ watts so that they have power to light your products.

Strobe monolights are often used in studio, but they can also be portable.

Though there are many ways to use different artificial lighting and a wide range of entry-lever sets for you to buy, the starter sets that we mentioned in this article can easily get you started in product photography.

Which lens for product photography?

Different styles of photography require different lenses. Each lens differs in aperture, build quality, and other factors.

If you do product photography, some lenses will suit you better than others.

Here is more about what you need to keep in mind when looking for the best lens for product photography.

Cropped or Full-Frame?

Before you choosing a lens, you need to know whether your camera has a cropped or full-frame sensor. The lens work differently, depending on which one you have.

Your lens on a crop sensor camera will act like its focal length multiplied by the crop factor of the camera. If a crop sensor camera has a crop factor of 1.6x, a 50mm lens will act like an 80mm lens. A 50mm lens on a camera with a full-frame sensor will behave like a 50mm one.

Cropped sensors cameras are much cheaper.

When it comes to small objects, a tighter crop often creates a more visually pleasing image.

Zoom Lens vs Prime Lens

The first thing to be considered while looking for a lens for product photography is prime vs zoom.

A prime lens will naturally give you sharper images. Some premium zoom lenses can give excellent results too.

For shooting still liife genres like product or food, a prime lens is more preferable. They don’t have the moving parts that zoom lenses require to change the focal length.

These moving parts can cause a lens diffraction. Lens diffraction is a phenomenon of optical physics. Diffraction occurs when light interacts with an object.

Best Prime and Zoom Lenses

  1. Canon 85mm f1.8
  2. Canon EF 50mm f/1.4 USM
  3. Canon 24-70 f2.4
  4. Sigma 24-105 f.4 Art

Lens Speed

Lens speed actually means maximum aperture. The smaller this number, the more light that can get in at a time.

This means that the shutter speed can be quicker and the lens is ‘faster’.

A lens with a maximum aperture of f/1.4 will allow you to take shots in a dark place better than a lens with a maximum aperture of f/4. As a still-life photographer, you’ll likely be working in a studio with artificial lighting.

Faster lenses also allow for a shallower depth of field. This means that the background will be blurrier when you’re focusing upon a subject in the foreground. This can be great for some types of still life photography like food.

Faster lenses capture more ambient light in flash photography.

Best option is to choose a lens with a speed of f/4 or below.

Macro Lenses

A macro lens is used for taking very sharp, detailed images close up to the subject.

A macro lens has a magnification of 1:1. So it reproduces a life-sized image of the product on the camera’s sensor.

This means you can get very close to your subject and it will still be in focus.

Sometimes you can see lenses that have a magnification ratio of 1:2 marked as “macro”. Only 1:1 ratio is true for macro.

Macros are also great for portraits and other types of cropped compositions.

It’s a great choice to have in your product photography setup.

Best Macro Lenses to recommend

  1. Canon 100mm
  2. Nikon AF-S VR Micro-NIKKOR 105mm f/2.8G IF
  3. Sony FE 90mm f/2.8

Focal Length and Minimum Focus Distance

It is a distance between the lens and the image sensor when the product is in focus. It’s always measured in millimeters (i.e. 28mm, 50mm, 100 mm.).

The shorter the focal length, the wider the angle of view and more area you can capture.

It’s really essential to know the focal length of a lens. This tells you how much it magnifies the subject when you take a picture.

The longer the focal length, the farther away you must be from your subject to be able to focus on it.

When shooting with the 100mm f/2, you need to be at least 91cm away from your subject to be able to focus on it.

With the 100mm f/2.8 macro lens, you can be anywhere from 31cm away and create a sharp photo.

It’s useful to know the minimum focus distance if you’re going to be doing macro or close-up photography. You’ll need to be able to get very close.

Conclusion

Some photographers believe that only premium lenses are good for professional work. This is not necessarily true.

The lens and build quality tend to be better in premium lines, such as Canon’s L-series. But don’t think that a lens is better only because it’s more expensive.

As mentioned above, a consumer-grade prime lens may be sharper than a premium zoom lens.

Before buying the certain type of lens, we recommend reading some reviews and checking out forums like reddit or facebook groups.

Tips for better lightning

Lightning product correctly need a little bit of gear and knowledge. We’ll cover some of the tips in this article for good lightning results. .

  1. Set up at least two unattached lights.You can use either speedlites or strobes. We’ll talk about triggering the lights in next posts.
  2. Use light modifiers.Most of the time you’ll use umbrellas and softboxes . They disperse and soften the light, and have lots of light spill, which lightens the whole scene.
  3. Place the lights strategically.One light should be 45 degrees behind the product, and the other 45 degrees in front of it on the opposite corner. Make sure the lights are high enough and point downward, at the subject. This will reduce the length of shadows.
  4. Make the light in the back slightly brighter than in the front.This practice will help separating the subject from the background. The front light will creates a fill in the front.
  5. Avoid ReflectionsMany products in product photography happen to be very reflective. Jewellery, bottles, glass, and more are hard to photograph.Areas that are reflective bounce the light off around. They mainly cause shadows in unwanted places.Nothing looks worse than a gorgeous golden ring with a camera lens reflection in its centre. Focus on the reflections! There will be a lot of moving lights around in order to find the perfect configuration. Other option is definitely spending too much time in retouch software, trying to get rid of these reflections.
  6. Make Sure The Colors Are RealisticAnother problem is to ensure that the colors of the product are realistic. Accurate colors are very crucial in any type of product photography.Many customers buy products based on the colours showcased by your images. You don’t want disappointed clients if the photos they receive don’t match up with their product.Every screen has a different color calibration. The colours will differ on a phone, on TV or on a laptop. But there are some ground rules to follow.Make sure that you use bulbs and flashes/strobes that have a true white tone in them. Generally, this is marked as ‘photography toned bulb’. A true white light will not cause any colour casts. You won’t get shades like the blue or green of a fluorescent or the orange of warm light. The result will be more correct colors.

How many photos should i take?

It depends on a product and the result we want to get. The more sharp areas we shoot, the more sharpened the whole piece will be. When we’re finished with taking pictures, all is left to do is to merge the photos using a software. The final photo will be combining every of focused areas on different photos.

Packshot photography – which camera for beginning?

One of the most asked questions asked by beginner photographers is which camera should they start with? There is a short and a long answer to this. The short answer is, whatever camera is suitable for you. The long answer we’ll get to below.

There are three types of cameras that beginner photographers use for product photography. The three categories are:

  1. Smartphone
  2. Point-and-shoot digital camera
  3. DSLR (digital single lens reflex) camera

Smartphones and point-and-shoot cameras have their limitations. Smartphone cameras have very limited options and the quality is really dependent on using the lighting appropriately. Lighting is one of the most important aspects when it comes to product photography. Point-and-shoot cameras are the cameras you would most commonly buy, like the Nikon CoolPix or the Canon PowerShot. They have more flexibility than the smartphone (different modes, optical zoom), but still limit your ability to take awesome product photos. That leaves us with the DSLR.

A DSLR camera gives you all the freedom to be creative, take great photos, change the look and feel of your images, and is not even that expensive for start. Entry level DSLR cameras start with pricetag around $500. DSLRs have the option to shoot manual, which gives more flexibility than on smartphone cameras and point-and-shoot cameras. DSLRs will also allow you to use different lenses, which will open up a lot of versatility you can do with these cameras, and will allow you to create better product photography. Here are some of the best picks for DSLRs:

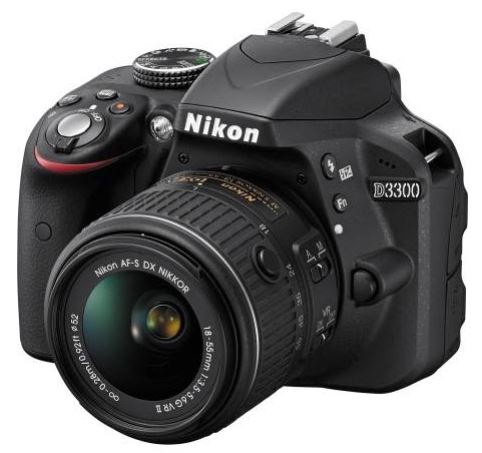
Nikon D3300

The Nikon D3300 is sold for about $550 USD. It has a 24 megapixel sensor and it is great for shooting objects also in lower light. It’s really user-friendly with it’s built-in guide that will help beginners learn the camera’s settings.

If you need a wi-fi, there is an additional device you can buy for the camera. A wireless adapter for about $80, pair the camera with your compatible smartphone or tablet, and the photos from your camera will pop up on your device.

The Nikon D3300 comes with an 18-55mm f/3.5-5.6 lens. Those numbers may not mean a lot for you, but they basically mean that it has a little bit of zoom and is suitable for normal lighting situations (but not so great for low light areas, like darker rooms, without the use of flash). This is the standard kit lens for entry level DSLRs and is really versatile and great for getting to know your camera.

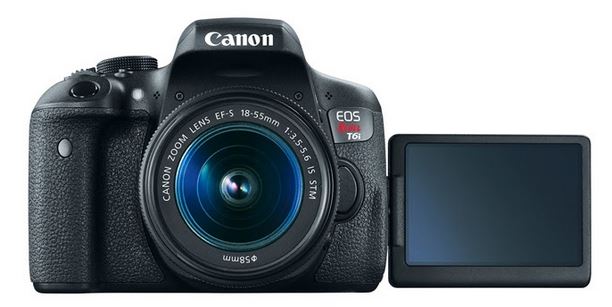
Canon EOS Rebel T6i (750D)

source: amytakespictures.com

The biggest competitors in the DSLR market are Nikon and Canon. There are other decent DSLR cameras, but these two really lead in the market.

The Canon Rebel T6i is comes with a built-in Wi-fi and movable touchscreen. It also costs more – 900$. Like the one before, the Canon Rebel T6i has fantastic image quality, low image noise at high ISOs (great for low light), and comes with an 18-55mm f/3.5-5.6 lens.

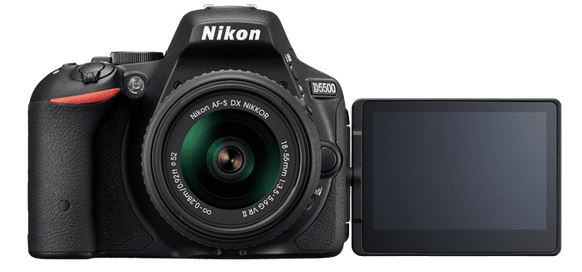
Nikon D5500


source: amytakespictures.com

We can say that this Nikon D5500 is very similar to the Canon in terms of gadgets like built-in wi-fi and movable touchscreen. Also, 24.2MP sensor on board and low noise at high ISO sensitivities. The Nikon D5500 costs about $850, including the camera body and the 18-55mm f/3.5-5.6 lens.

So, these are the best three picks for entry level DSLRs for beginners’ product photography. Of course, there are better cameras out there, but they also cost more. But for beginner photographers there’s no need to invest thousands in photography equipment yet. These picks will do just fine.

FOCUS STACKING

Probably most of you, who have stumbled upon photography (especially macro), know very well what depth of field means. The focus stacking method means that we merge more than 2 photos, sometimes dozens of them – yes this is how much we often need to create our piece of art!

Creating this set of photos, on every photo we need to focus on a different area of a subject. It’s important to remember to shoot the photos using a stand and the best practice would also be to use a cable release to take a photo without touching the camera.

How many photos should i take?

It depends on a product and the result we want to get. The more sharp areas we shoot, the more sharpened the whole piece will be. When we’re finished with taking pictures, all is left to do is to merge the photos using a software. The final photo will be combining every of focused areas on different photos.

What is a PACKSHOT?

It’s a term that we see everyday! A packshot is nothing else than showing the product on a (almost every time) white background. Making this kind of photo for e-commerce needs, we are capable to fully recreate the product a focus the whole attention on its look, because there are no other subjects that could distract the viewer.

How to correctly make a packshot photo?

First and foremost, it’s important to lighten it very well. Unfortunately, every product needs an individual lightning set, that is way the beginnings are experimental 🙂 The more products we do, the easier set preparing will get which will lead to a more sped up work process which is very important factor in this industry. More about lightning you’ll have a chance to read in next articles.

When a raw picture is correctly shot and the product was cleaned up prior to shooting, then the retoucher will have much easier work. The 1 minute of cleaning the product up, will save the 5 additional minutes in retouch.

What does cutting the picture mean?

It’s nothing else than cutting the subject from the background. There are plenty of ways when doing this. All depends on the type of picture we get. We can use a pen, lasso, magic wand and many other tools. This also depends on the retoucher skillset. More information about this we’ll cover in next articles.

PHOTOGRAPHY BASICS

If you are a beginner in photography, then we’re very happy you came across our page! We’ll briefly try to share with you some of the most crucial information.

While shooting photos, we always have to deal with the exposure triangle. So what’s an exposure? It’s basically, amount of light that comes to our image sensor. If the settings of our camera are set correctly, then the amount of light will be true to the real scenery.

What is an exposure triangle then?

It’s a relation between 3 parameters: exposure time, aperture and ISO sensitivity. We’ll briefly discuss each of the parameters below.

EXPOSURE TIME

It’s a time of a camera sensor registering the light. We can find wide range of settings in a camera to fit it to any given situation. Choosing the time of 1/120 sec, the camera will register the light exactly in this time.

It’s important to remember that the longer the time, the higher the risk that image won’t be as sharp, it can even get blurred. So, shooting photos with no stand or images in motion, we need to remember to set the exposure time to rather short.

Exposure time is also fun way of experimenting! I think everybody once saw these night lights streaks made with cars! It’s nothing else than the result of long exposure time.

APERTURE

It’s always marked with a symbol ‘f’. What does the aperture actually mean? It’s a component of a camera that is built from so called “leaves”. They create holes that differ in size, depending on what value we set.

Aperture is responsible for the light coming to the sensor, what does this mean? If we decide to set the lower aperture (more opened), there will be more light coming to the sensor and the pictures will get lightened. But if we change aperture value to higher (more closed) then the aperture will get less light and the picture will be darker. In this case, it’s crucial to set the other parameters (like aperture time or ISO), just so the picture brightness would stay the same.

Speaking about the sharpness of a photo, we can mainly say that the aperture is a key factor. The lower the aperture, the less sharp objects will be registered by camera. If we care about the photo being more sharp, we should set the higher aperture. For example, setting the aperture to f/2.8, the photo will be brighter than when setting it to f/16 (assuming that other settings will stay the same).

ISO

ISO value shows us on what level will the sensor be light sensitive. The higher the ISO, the brighter the picture. And vice versa. We need to be careful with ISO setting! Though low values like 100/200/300/400 are recommended, higher values can lead to different create types of image noise. Unfortunately, in this case more of picture details will be lost, colors and contrast will be much lower.